
These no bake peanut butter energy bites are a lifesaver in my kitchen, especially when life gets a little hectic. They’re the perfect grab-and-go snack that tastes like a treat but fuels you like a champion. Whether you need a quick breakfast boost or a post-workout pick-me-up, these little gems hit all the right notes.
Why You’ll Love These Energy Bites
The Secret Twist for Unforgettable Flavor: I’ve discovered that toasting just half of your oats before mixing creates a depth of flavor that mimics a baked oatmeal cookie. This simple step unlocks a rich, nutty aroma and taste that truly elevates these bites from a simple raw snack to a gourmet delight.
Ready in a Flash: In my experience, these are perfect for those busy mornings or afternoon slumps. You can have a batch of these wholesome no bake peanut butter energy bites ready to chill in under 15 minutes, making healthy eating incredibly easy.
Only Four Simple Ingredients: You won’t need a long shopping list for this recipe. Just a handful of pantry staples come together to create these satisfyingly sweet and chewy treats.
Perfectly Customizable: These energy bites are wonderfully versatile. They can easily be adapted to be vegan or gluten-free, and I love experimenting with different mix-ins to suit any craving or dietary need.
Ideal for Meal Prep: Make a big batch at the beginning of the week, and you’ll have a healthy snack ready to grab from the fridge whenever hunger strikes. It’s a fantastic way to ensure you always have a nutritious option on hand.
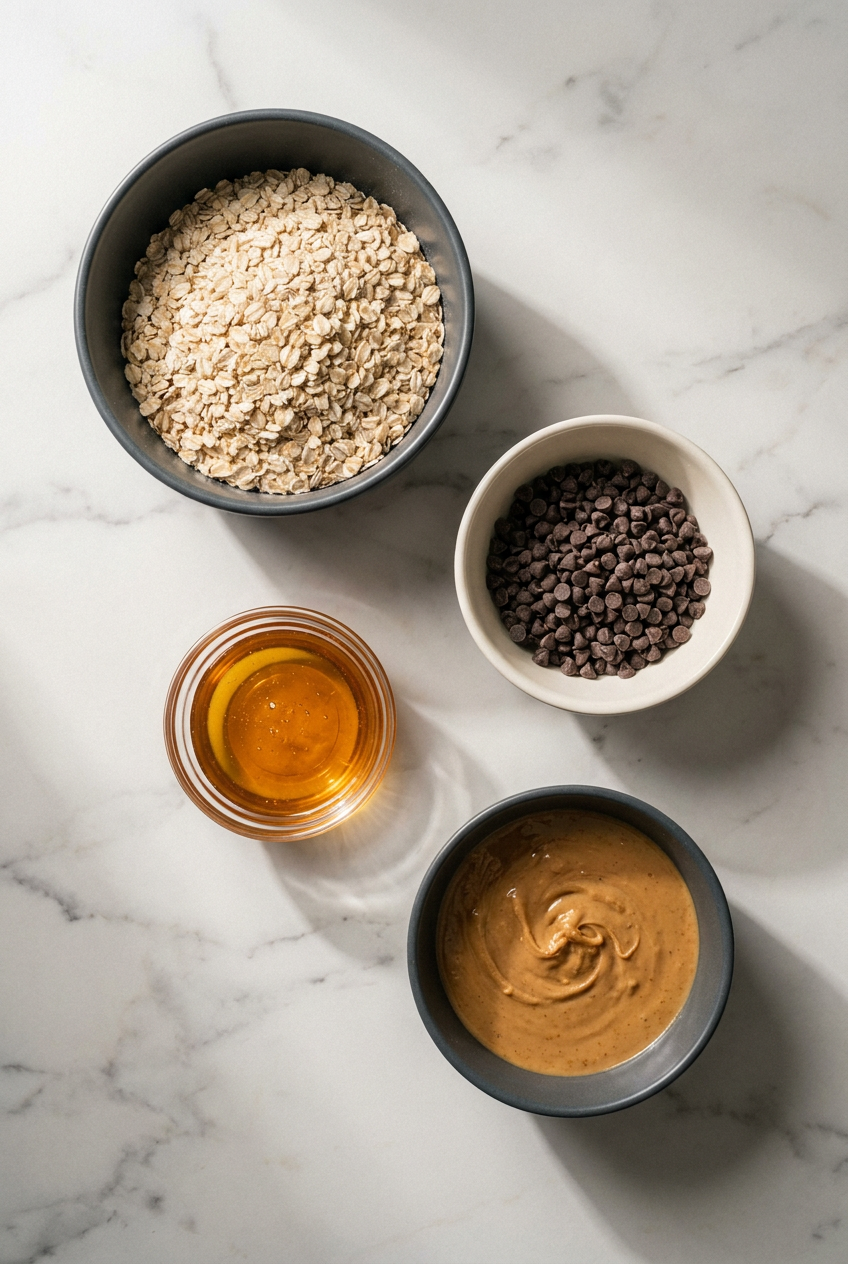
Ingredients
Creating these delightful energy bites starts with choosing the right ingredients. Each one plays a crucial role in achieving that perfect chewy texture and rich flavor we’re after.
Ingredients
- 1/2 cup quick-cooking oats
- 1/4 cup mini chocolate chips or regular size semi-sweet chocolate chips or dark chocolate chips
- 2 tablespoons honey
- 1/4 cup creamy or crunchy peanut butter
Ingredient Notes & Substitutions
Peanut Butter Showdown: The type of peanut butter you use truly makes a difference here. I always recommend using a “no-stir” peanut butter, like Jif or Skippy, because their emulsifiers prevent oil separation. This leads to a stable, non-greasy dough that holds its shape beautifully. Natural peanut butter, with its separated oils, can make your mixture too wet and messy, making it difficult to form the perfect energy balls.
The Best Oats: Quick-cooking oats work wonderfully for these bites, providing a tender chewiness. However, if you only have rolled oats on hand, they can certainly be used! For an even smoother texture that’s less chewy, try pulsing your rolled oats in a blender until they form a coarse flour before adding them to the mixture.
Sweetener Options: While honey lends a lovely flavor and binding quality, you can absolutely make these energy bites vegan-friendly. Simply swap the honey for maple syrup, using it in a 1:1 ratio. The consistency and sweetness will be very similar.
Mix-In Ideas: This is where you can get creative! Feel free to fold in 1-2 tablespoons of extra goodness like flax seed, chia seeds, protein powder, shredded coconut, or even finely chopped dried fruit. Just a little tip from my kitchen: if you add more dry ingredients, you might need to add an extra teaspoon of water or milk to maintain the perfect dough consistency.
How to Make No Bake Peanut Butter Energy Bites
Making these energy bites is incredibly simple, and with my little secret step, they turn out even more delicious than you’d expect. Follow along to create your own batch of delightful treats.
The Flavor-Boosting First Step
First, we’re going to elevate the flavor significantly. Pour half of your quick-cooking oats (that’s 1/4 cup) into a dry skillet over medium heat. Stir them frequently for about 3-4 minutes, until they become wonderfully fragrant and just lightly golden. This is the secret to that deep, nutty, almost baked cookie flavor! Once toasted, remove them from the heat and let them cool down slightly.
Combining the Dry Ingredients
- In a medium-sized mixing bowl, combine your now slightly cooled toasted oats, the remaining raw oats, and your chocolate chips. I like to measure these dry ingredients first to ensure nothing sticks to the measuring cup when the peanut butter is added.
Adding the Wet Ingredients
- Next, add the creamy or crunchy peanut butter and the honey directly into the bowl with your dry ingredients.
Mixing and Chilling for Success
- Stir everything together thoroughly using a sturdy spoon or spatula until a thick, uniform dough forms. The mixture should be a bit stiff and, when you squeeze a small amount, it should hold its shape without being overly sticky.
- For the easiest rolling experience, cover the bowl tightly and chill the mixture in the refrigerator for at least 30 minutes. Trust me, this step is non-negotiable and prevents a sticky, frustrating mess!
Shaping and Storing
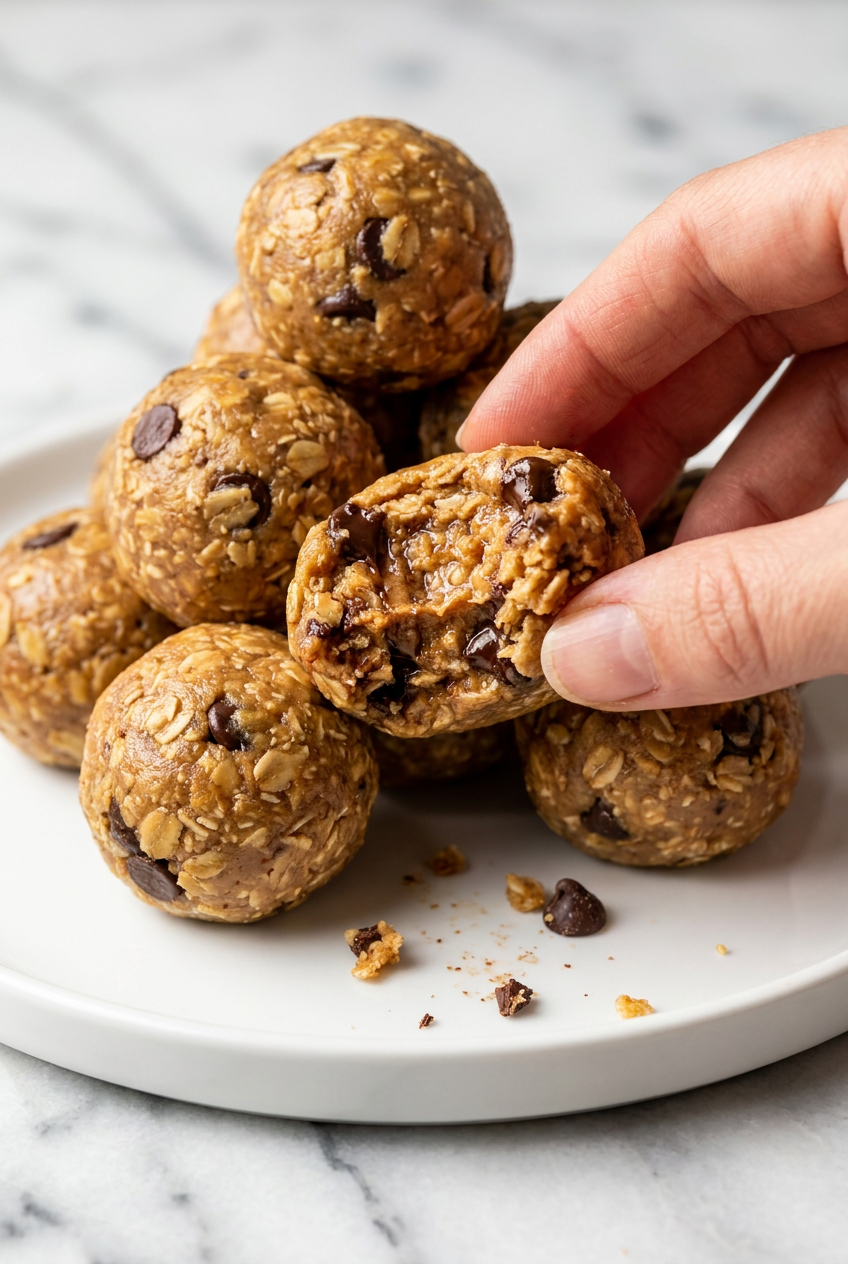
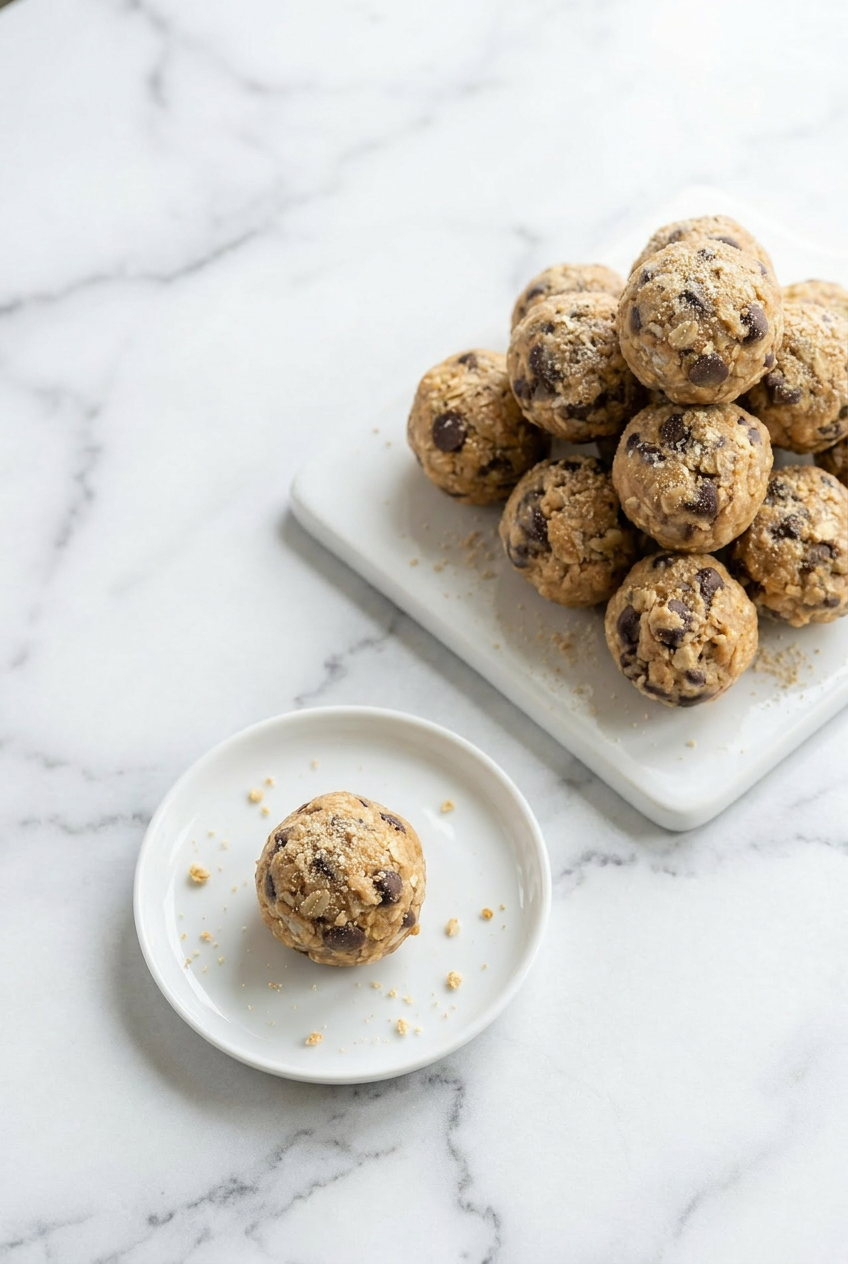
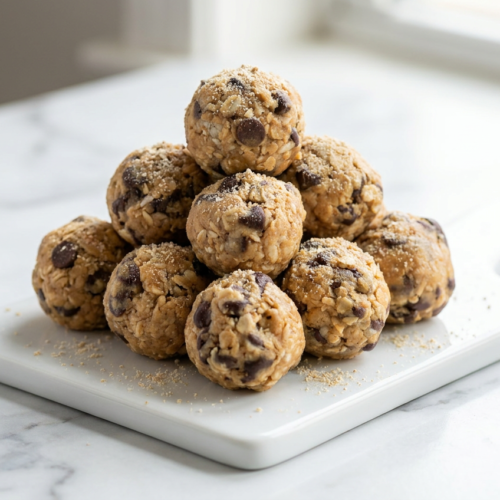
- Once chilled, use a 1-tablespoon cookie scoop to portion out the dough. Roll each portion gently between your hands to form smooth, round balls.
- Place your finished energy bites in an airtight container. While you can enjoy them right away, their texture is truly best after they’ve had an hour or so to firm up in the fridge.
The Secrets to Perfect Energy Bites
Achieving that perfect, chewy, non-sticky energy bite isn’t magic, it’s just a few simple kitchen secrets that I’m happy to share with you.
The Texture Secret: The ideal consistency for your mixture should feel like a very thick cookie dough. It needs to be firm enough to hold its shape when gently squeezed, but it shouldn’t leave a sticky residue on your hands. The critical step of chilling the dough before rolling is what makes this perfect texture achievable and prevents frustration.
The Measurement Secret: While I’ve given you precise cup measurements, a kitchen scale can offer ultimate consistency for baking and no-bake treats. However, for these bites, simply knowing how to adjust your mixture is key: if it’s too sticky, add a touch more oats; if it’s too crumbly, a little extra peanut butter will usually do the trick.
The No-Stir Peanut Butter Secret: I can’t emphasize this enough: “no-stir” peanut butter is your best friend here. Its stable emulsion is the foundation for a perfectly structured energy bite. Unlike natural peanut butter, it won’t separate and release excess oil, ensuring your bites remain beautifully intact and never greasy.
The Uniformity Secret: For beautiful, consistent portions every time, I always reach for a small cookie scoop. It’s a professional trick that not only ensures each ball is the same size but also helps with portion control, making these a truly reliable healthy snack.
Tips, Tricks, and Troubleshooting
Even the simplest recipes can benefit from a few expert insights. Here are my favorite tips for guaranteed success, and how to fix things if they don’t go quite as planned.
Pro Tips for Success
- Blend Your Oats: If you prefer a smoother texture without too much chewiness, remember my earlier tip about blending your rolled oats into a coarse flour. It makes a significant difference in mouthfeel.
- Don’t Skip the Chill: This is arguably the most crucial step! Chilling the dough before you roll it makes it much firmer and far less sticky, transforming the experience from a struggle to a breeze.
- Adjust for Add-Ins: When you’re adding dry ingredients like protein powder or flax seed, always remember that you might need to compensate. A tiny bit of extra water, milk, or even a drizzle more honey can help bring the mixture back to the perfect consistency.
Troubleshooting Common Problems
“My mixture is too dry and crumbly!” This often happens if you’ve added too many dry mix-ins or if your peanut butter was exceptionally thick. The simple fix is to add a little more peanut butter or honey, one teaspoon at a time, mixing well after each addition until the dough comes together beautifully.
“My mixture is too sticky/wet!” This issue usually rears its head when using a very oily natural peanut butter that separates easily. To remedy this, add more rolled oats (or oat flour), a tablespoon at a time, until the dough feels firm enough to handle comfortably. Remember, chilling is extra important in this scenario!
How to Serve and Store Your Energy Bites
These versatile bites are perfect for so many occasions, and they store beautifully so you can always have a stash on hand.
Serving Suggestions
- These make a perfect post-workout protein ball, giving you that much-needed energy boost.
- They are an easy on-the-go breakfast or a healthy snack that fits perfectly into school lunches.
- Enjoy them as a satisfying dessert to curb that sweet tooth without overdoing it. For another quick and customizable healthy breakfast or snack, consider making a protein yogurt bowl.
- If you love the chocolate peanut butter combination, you might also enjoy our recipe for chocolate peanut butter protein overnight oats.
- Pair these bites with a refreshing high-protein peanut butter smoothie for a complete, energizing boost.
Storage and Freezing Instructions
In the Refrigerator: Store your no bake peanut butter energy bites in an airtight container in the refrigerator. They will keep beautifully for up to 2 weeks, perfect for consistent snacking throughout your busy schedule.
In the Freezer: These bites are excellent for meal prep and freeze wonderfully! Flash-freeze them first by spreading them in a single layer on a baking sheet until solid. Then, transfer them to a freezer-safe bag. They’ll maintain their quality for up to 3 months. You can enjoy them straight from the freezer for a firmer bite or let them thaw for a few minutes to soften.
Easy No Bake Peanut Butter Energy Bites
Equipment
- Dry skillet
- Medium-sized mixing bowl
- Sturdy spoon or spatula
- Airtight container
- 1-tablespoon cookie scoop
- Baking sheet
Ingredients
- 1/2 cup quick-cooking oats
- 1/4 cup mini chocolate chips or regular size semi-sweet chocolate chips or dark chocolate chips
- 2 tablespoons honey
- 1/4 cup creamy or crunchy peanut butter
Instructions
The Flavor-Boosting First Step
- Pour half of the quick-cooking oats (1/4 cup) into a dry skillet over medium heat. Stir frequently for 3-4 minutes until fragrant and lightly golden. Remove from heat and let cool slightly.
Combining the Dry Ingredients
- In a medium-sized mixing bowl, combine the slightly cooled toasted oats, the remaining raw oats, and the chocolate chips.
Adding the Wet Ingredients
- Add the creamy or crunchy peanut butter and the honey directly into the bowl with the dry ingredients.
Mixing and Chilling for Success
- Stir everything together thoroughly using a sturdy spoon or spatula until a thick, uniform dough forms. The mixture should be stiff and hold its shape when squeezed without being overly sticky.
- Cover the bowl tightly and chill the mixture in the refrigerator for at least 30 minutes to prevent stickiness during rolling.
Shaping and Storing
- Once chilled, use a 1-tablespoon cookie scoop to portion out the dough. Roll each portion gently between your hands to form smooth, round balls.
- Place the finished energy bites in an airtight container. While they can be enjoyed immediately, their texture is best after firming up in the fridge for about an hour.
Notes
Nutrition
Frequently Asked Questions
What’s the best kind of peanut butter for energy bites?
For the best texture and ease of handling, I highly recommend using a “no-stir” creamy or crunchy peanut butter. These varieties have emulsifiers that keep the oil from separating, resulting in a more stable and less greasy dough.
My energy bites are too sticky or too dry. How do I fix them?
If your mixture is too sticky, it’s often due to too much liquid or an oily natural peanut butter. Add an extra tablespoon of oats at a time until it reaches a manageable consistency. If it’s too dry and crumbly, add a teaspoon of honey or peanut butter until the dough comes together nicely.
How should I store no-bake energy bites and how long do they last?
Store your energy bites in an airtight container in the refrigerator for up to two weeks. For longer storage, you can freeze them for up to three months. They hold their quality wonderfully in the freezer.
Can I customize this recipe with protein powder or other mix-ins?
Absolutely! This recipe is fantastic for customization. You can add 1-2 tablespoons of protein powder, flax seed, chia seeds, shredded coconut, or chopped dried fruit. Just remember that if you add more dry ingredients, you might need a tiny bit of extra liquid like water or milk to keep the perfect consistency. For more ideas on how to successfully incorporate protein powder into your snacks, consider our protein overnight oats recipe.
Are peanut butter energy bites a healthy snack?
Yes, these no bake peanut butter energy bites can certainly be a healthy snack! They are packed with fiber from oats, protein and healthy fats from peanut butter, and natural sweetness. They provide sustained energy, making them a much better choice than processed snacks.
What are the best oats for energy bites: rolled, quick, or steel-cut?
Quick-cooking oats are ideal for these no-bake bites as they absorb liquid quickly and contribute to a soft, chewy texture. Rolled oats can also work, especially if pulsed lightly in a blender first for a smoother finish. Steel-cut oats are generally too tough and require cooking, so they are not suitable for this particular recipe.